
Behind every Domex glass keypad is an ElectroBox — the in-wall module that does the switching. The DX-ElectB-R6 is the relay ElectroBox: six relay outputs that turn one keypad into a controller for lights, roller shutters, curtains and blinds.
Here is the R6 from an installer’s point of view: outputs, configurations, wiring and setup.
Six relays, many layouts
The R6 has six relay outputs rated 8 A each, with a total load of up to 3400 W across all outputs. Those six outputs can be used as:
- Up to six light zones (L1, L2, L3, L4, L6),
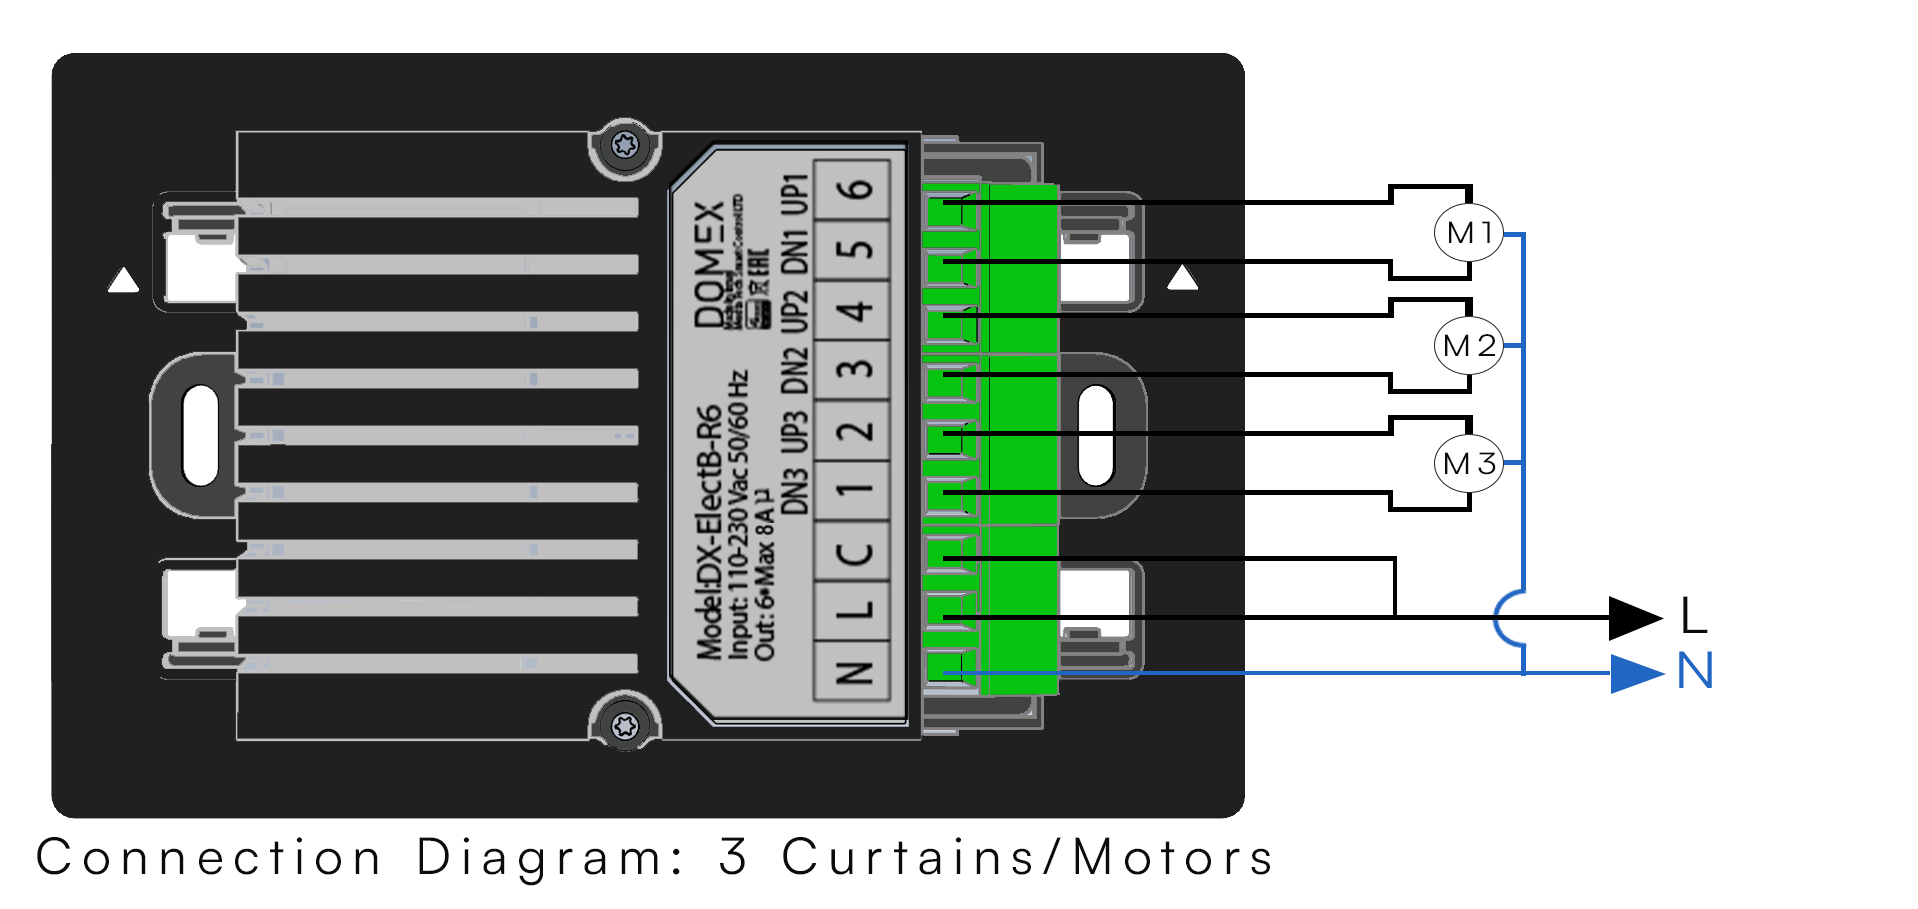
- Up to three motors — roller shutters, curtains or awnings — each on an UP/DOWN pair (M1, M2, M3),
- A mix of both (L2M1, L2M2, L4M1),
- In-glass blinds with tilt control (Shade 1–3),
- or a Master keypad for group on/off and scene commands.
The glass faceplate follows the configuration, so a living-room keypad with two light zones and two shutters looks — and is engraved — exactly for that room.
The common terminal: one module, any voltage
The R6’s C (Common) terminal is a voltage pass-through. Whatever is connected to C is what the relays switch to the outputs:
- 230 VAC for mains loads — lighting circuits and mains shutter motors,
- 24 V for low-voltage loads — low-voltage motors and in-glass blinds,
- or a dry (volt-free) contact for gates, curtains and third-party inputs.
That flexibility is why the same R6 module can serve a lighting panel in one room and a motorised curtain track in the next.
Technical specifications
| Model | DX-ElectB-R6 |
| Power supply | 110–230 VAC, 50/60 Hz |
| Outputs | 6 relays, 8 A per output |
| Total load | Up to 3400 W (all outputs) |
| Common (C) | Voltage pass-through: 230 VAC, 24 V or dry contact |
| Terminals | N · L · C · 1–6 (motors: UP1/DN1, UP2/DN2, UP3/DN3) |
| Relay modes | Normally open, normally closed, push button |
| Shutter travel time | UP and DOWN each 0–240 seconds |
| Neutral | Required |
| Radio | Z-Wave 800, works as a mesh repeater |
| Frequency | EU 868.4 / 869.4 MHz · IL 916 MHz · AU/BR 919.8 / 921.4 MHz · US 908.4 / 916 MHz |
| Glass faceplate | 125 × 85 mm (P3) or 150 × 85 mm (P4) |
| Depth with faceplate | 36.6 mm — wall box minimum internal depth 32 mm |
| Wall box | EU 503 (P3) / EU 504 (P4); US: Cantex EZ18SNW |
| Operating temperature | −5 °C to 60 °C, humidity 5–90 % non-condensing |
Wiring
Remove the glass, connect the wires to the terminals and tighten every screw to avoid loose connections.
- Connect mains to L and N (neutral is required), and feed the C terminal with the voltage the outputs should switch — for mains lighting, link C to L.
- Lights: wire each light zone to its output, with the return to N.
- Motors: wire each motor to its UP/DOWN pair — UP1/DN1, UP2/DN2, UP3/DN3 — with the motor common to N.

Do not connect inductive loads such as transformers unless the configuration supports them, and always follow local electrical regulations.
Setting it up in PCC
In Domex PCC the installer chooses the configuration and tunes each output:
- Relay mode per output — normally open, normally closed or push button (momentary).
- Shutter travel time — UP and DOWN separately, 0–240 seconds — so a shutter can stop at a precise position such as 50 %.
- Blind tilt and open/close timing for in-glass blinds.
Adding the R6 to the network
- Pre-configure the device in Domex Cloud (PCC).
- Keep it within Z-Wave range of the controller and set the controller to Add / Include mode.
- Hold button 1 for 10 seconds until all LEDs turn green.
On power-up the LEDs blink three times (blue, green, red) and settle to constant blue. To remove the module, set the controller to Remove / Exclude, press the reset button with a small pin and hold button 1 for 10 seconds. Every R6 also acts as a Z-Wave repeater, extending the mesh through the house.
The same glass everywhere
Lights, shutters and blinds all live behind the same Domex glass — Core, Diviso or Sculptured, in Black, White, Metallic Gray or Metallic Gold, gloss or matte, with backlit engraving for every button. One design language, whatever the R6 is switching.
Explore the R6 configurations on the Domex products page, or find a certified Domex dealer.