
Every Domex glass keypad is two things: the glass you touch, and the electronics behind it. That module is called the ElectroBox. The DX-ElectB-D6 is the dimmer ElectroBox — the module that turns a Domex keypad into a precise, flicker-free dimmer for up to six lighting zones.
This article is the technical view: what the D6 drives, how it is wired, and how it is set up in Domex PCC.
Six zones, two dimming technologies
The D6 combines two kinds of dimming in one in-wall module:
- 4 × triac zones (D1–D4) for mains-voltage dimmable fixtures — 300 W resistive (incandescent) or 150 W capacitive (LED) per zone.
- 2 × 0–10 VDC outputs (V1, V2) for LED drivers with a 0–10 V dimming input. The external driver powers the load; the D6 sends the dimming signal.
That means one keypad can dim decorative pendants and wall lights on the triac channels, and linear LED profiles or downlight groups on their own drivers — from the same glass.
Configurations
The same module covers the whole dimmer family, with the faceplate layout matching the zones in use:
- D1, D2, D3, D4 — one to four triac zones.
- D6 — four triac zones plus two 0–10 V zones.
- DL1, DL2 — one or two 0–10 V zones only.
Each zone is not limited to dimming its own load: a button can also act as a remote dimmer for another device, an on/off switch, a command sender or a scene button.
Technical specifications
| Model | DX-ElectB-D6 (configurations D1–D4, D6, DL1, DL2) |
| Power supply | 110–230 VAC, 50/60 Hz |
| Triac zones | Up to 4 (D1–D4) — 300 W resistive / 150 W LED per zone |
| Analog zones | Up to 2 × 0–10 VDC (V1, V2, common C) |
| Terminals | N · L · D1 · D2 · D3 · D4 · V1 · V2 · C |
| Neutral | Required |
| Radio | Z-Wave 800, works as a mesh repeater |
| Frequency | EU 868.4 / 869.4 MHz · IL 916 MHz · AU/BR 919.8 / 921.4 MHz · US 908.4 / 916 MHz |
| Glass faceplate | 125 × 85 mm (P3) or 150 × 85 mm (P4) |
| Depth with faceplate | 36.6 mm — wall box minimum internal depth 32 mm |
| Wall box | EU 503 (P3) / EU 504 (P4); US: Cantex EZ18SNW |
| Operating temperature | −5 °C to 60 °C, humidity 5–90 % non-condensing |
Wiring
Installation follows the same pattern as every Domex ElectroBox: remove the glass, connect the wires to the terminals, and tighten the screws so there are no loose connections.
- Connect L and N (neutral is required).
- Wire each mains-voltage dimmable fixture to its triac channel, D1–D4, with its return to N.
- For 0–10 V zones, connect V1 and V2 to the Dim + input of each LED driver, and C to Dim −.
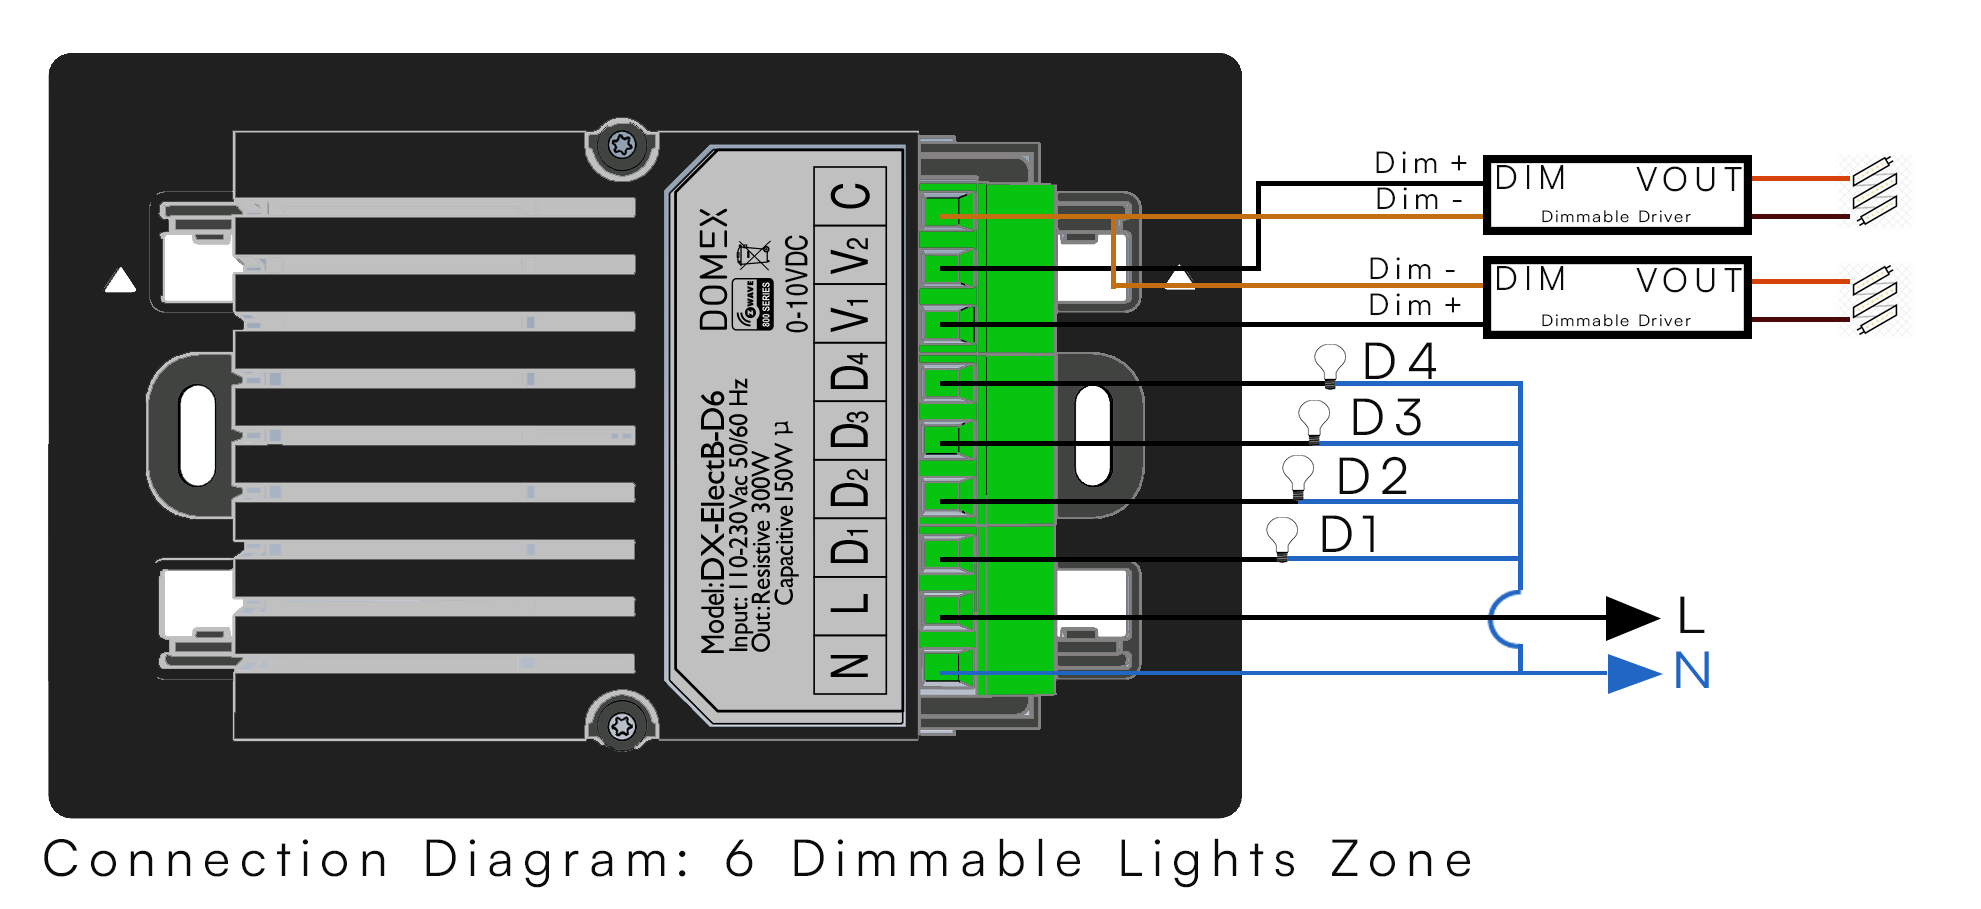
When power is applied, the keypad LEDs blink three times (blue, green, red) and settle to a constant blue — the module is on and ready.
Tuning the dimming in PCC
LED fixtures differ, and the D6 is built to be tuned to them rather than the other way round. In Domex PCC, the installer sets, per zone:
- Minimum and maximum level (0–100 %) — to remove LED flicker at the bottom of the range and cap the top.
- Soft ON and Soft OFF time — how fast the light fades up and down.
- Button LED colour for the ON and OFF states.
The result is dimming that feels smooth and deliberate — a slow rise in the morning, a soft fade at night — with no flicker at low levels.
Adding the D6 to the network
- Pre-configure the device in Domex Cloud (PCC).
- Keep it within Z-Wave range of the controller and set the controller to Add / Include mode.
- Hold button 1 for 10 seconds until all LEDs turn green.
To remove it, set the controller to Remove / Exclude, press the reset button with a small pin and hold button 1 for 10 seconds; the keypad blinks blue, green and red when it has left the network. Like every ElectroBox, the D6 also works as a Z-Wave repeater, strengthening the mesh around it.
One glass, every finish
The D6 sits behind the same Domex glass as every other keypad — Core, Diviso or Sculptured buttons, in Black, White, Metallic Gray or Metallic Gold, gloss or matte, with backlit engraving designed in PCC. The dimmer looks exactly like the rest of the house; only the light changes.
See the D6 configurations on the Domex products page, or find a certified Domex dealer to plan your lighting.